Jim Connett, on December 27, 2018, 03:45 PM
E10 Unmasked – Part 2, The Big Three
In E10 Unmasked – Part 1, we looked at a generalized overview of the SEMI E10 standard. With this foundation, we are ready to go to the next level and unpack the six defined equipment states. Today, we’ll peer into definitions and use cases involving three of the most common tool states in the SEMI E10 standard: STANDBY TIME, PRODUCTIVE TIME, and ENGINEERING TIME. In Part 3, we’ll dive deep into UNSCHEDULED DOWNTIME, ENGINEERING TIME, and often misunderstood NONSCHEDULED DOWNTIME states. We will conclude with Part 4 and an examination of common questions received over the years specific to E10. In fact, if you have specific E10 questions, please feel free to email us.
SEMI E10 Equipment States
But before we proceed, let’s pause for a public service announcement.
The official E10 standard is controlled, reviewed and updated by SEMI1. This standard, and all supporting substandards, is described in specific detail by SEMI in their official documentation which is accessible to paid subscribers. The publicly available definitions and personal anecdotes make this E10 Unmasked series a great place to begin your E10 journey (or help refresh your current knowledge), and the official documentation is a natural and necessary “next step” toward a successful E10 implementation. I cannot recommend strongly enough a yearly subscription to the official E10 documentation!
Now, back to our regularly scheduled programming.
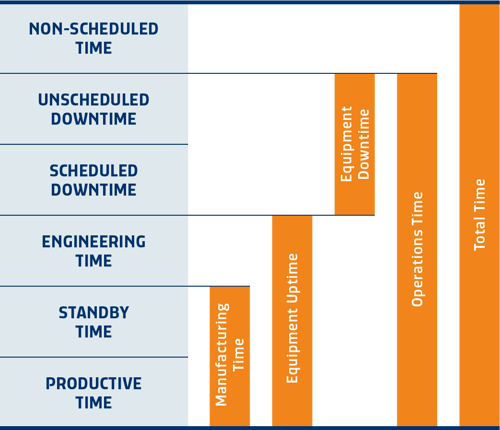
 Figure 1 – SEMI E10 defined “buckets” of time (Pomorski, n.d.)
SEMI E10 Standby Time
A tool2 is considered in a STANDBY TIME (or IDLE) state when it is available for any type of process capable on the tool but is not processing at this moment in time. In other words, STANDBY TIME represents a state of current activity. If WIP3 arrives at the tool in the next five seconds, a tool in STANDBY TIME can receive this material and run the prescribed process (all things being equal). According to E10, the tool will transition from STANDBY TIME to PRODUCTIVE TIME.
SEMI E10 Productive Time
A tool in a PRODUCTIVE TIME state is, at a given moment in time, following a plan of execution that, when finished, will satisfy the process requirement(s) for that material at that current point of process in the workflow. Phew! That was a mouthful. In sum, a tool in PRODUCTIVE TIME is engaging in the manufacturing activity for which it was designed and purchased. This may mean the tool is etching silicon or depositing a substrate (both value-added processes), or it may be measuring precise dimensions down to the molecular level (a non-value-added process, but a necessary manufacturing monitor process).
It is at this point that simplicity ends and complexity begins for most organizations as they strive to identify the best point in time to mark the transition from STANDBY TIME to PRODUCTIVE TIME and then back to STANDBY TIME.
So, let’s take a two-question quiz.
Question 1: When should a tool transition to a PRODUCTIVE TIME mode?
- When it's loading the material to be processed
- When the material has been assigned to the tool by an automation or user-instantiated load process
- When the material is physically in the tool and ready to be “consumed” by the tool
- All of the above
- None of the above
Question 2: When does my tool transition to a STANDBY TIME mode?
- When the material is unloading
- When the material is completely removed from the tool
- When the tool indicates the process is complete
- All of the above
- None of the above
Ask yourself these questions. Now imagine the same questions presented to you, an industrial engineer, a process engineer and an IT engineer in a conference room at your location. Do you think their answers will align with yours? Furthermore, are your answers and their answers applicable to all tools?
These seemingly benign questions are actually very important! The entry and exit points of STANDBY TIME and PRODUCTIVE TIME may be measured in seconds per material run, but over time, these seconds turn to minutes – even hours! It’s important to identify clear entry and exit points for STANDBY TIME and PRODUCTIVE TIME states and, as much as is possible, apply the definitions uniformly across all tools.
SEMI E10 Engineering Time
The third state in our baseline triple-crown is ENGINEERING TIME. This state is much less about the physical disposition of a tool and more about the categorization of time for an entity within PRODUCTIVE TIME or STANDBY TIME. Let’s say an engineer is evaluating a new process or recipe on a tool. This engineer has introduced engineering wafers into the tool for processing. By our definitions above, this tool should transition from STANDBY TIME to PRODUCTIVE TIME and will eventually transition back to STANDBY TIME. But the material produced during the PRODUCTIVE TIME may not be viable or sellable, and the investigatory nature of engineering work often results in an interrupted process. By logging the tool to an ENGINEERING TIME state, the STANDBY TIME and PRODUCTIVE TIME consumed by the engineer on this tool – a tool that is otherwise available for production material – is appropriately allocated to the engineering group rather than the manufacturing group. For most E10 applications, simply logging the tool to an ENGINEERING TIME state is sufficient; however, some may want to collect time while in STANDBY and PRODUCTIVE under ENGINEERING control. With E10, this is possible.
Evaluating Tool Performance
So what information can these foundational equipment states provide regarding the performance of the tool? Well, measuring the total STANDBY TIME plus total PRODUCTIVE TIME provides a quantifiable number representing the manufacturing time of the tool for a given period. And, if you add in the ENGINEERING TIME to that same time period, you now have the equipment uptime.

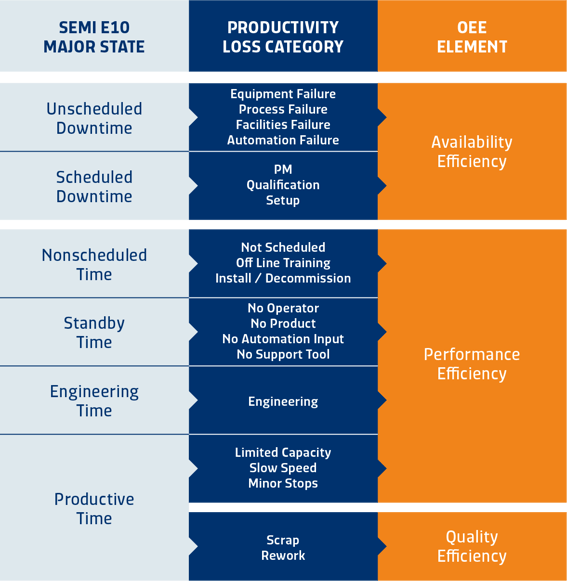
Figure 2 – SEMI E79 definitions (Pomorski, n.d.)
As standalone values, these results are helpful in evaluating the productivity of a tool. And, if these values are incorporated into SYSTEMA’s Operational Equipment Efficiency Module (OEE), this data can be quickly calculated and charted across toolsets, areas, or even entire facilities over multiple weeks as well as state changes on batch or multi-lot tools. But how do we properly account for the times when – not if – tools need repair or are inoperable? In our next article in the E10 Unmasked series, we will examine how to categorize time when, for example, a transfer robot loses its mind, a raw material runs out during the manufacturing process, your facility is evacuated, or even a lack of operators due to holidays!
Spoiler alert: a lack of operators is not STANDBY time!
1. http://www.semi.org
2. A tool can also be called “entity” or “machine”. In general, we’re talking about a piece of hardware used to complete a given step in the manufacturing of material in your facility.
3. WIP is defined as any product, device, or component in an unfinished state of creation or construction.
Be the first to comment.